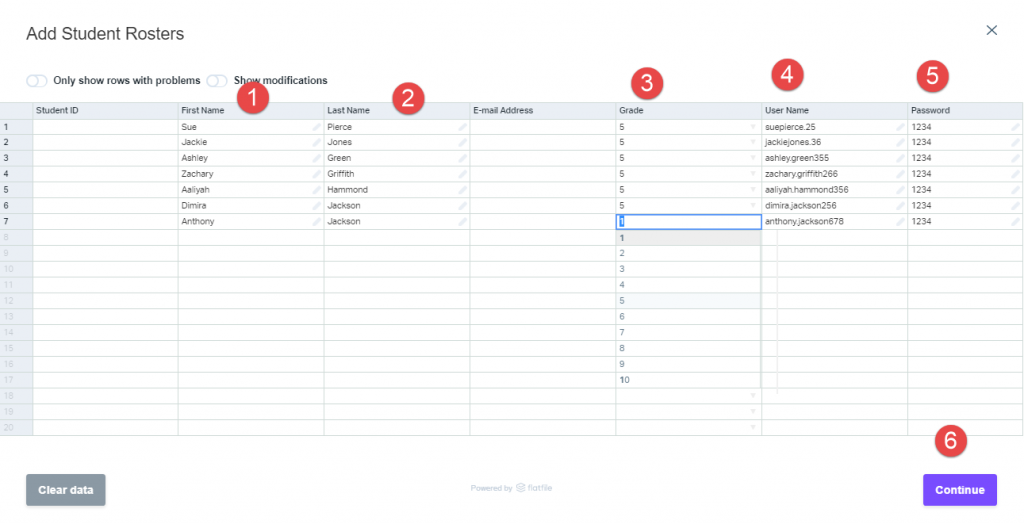
If you are enrolling a large roster of students in BrightFish Reading, you can use the “Import Students” tool to create multiple student accounts at once.
In your Classes tab, click on “Import Students” from your left sidebar menu (under Tools).
To start building your list, select your school and click “Import Students.”
 There are two ways to import students. In this article, we’ll show you how to use the manual roster builder shown on the screen under “…or just manually enter your data here.” (For instructions on importing a list from a file, click here. )
Using the “Add Student Rosters” Form
The Student Rosters form functions just like a spreadsheet, so you can copy information into it and move items around as needed.
(Student ID is optional – you can skip this field.)
Step 1: Type or copy student first names into the First Name column.
Step 2: Type or copy student last names into the Last Name column.
(Email Address is optional – you can skip this field.)
Step 3: Select a grade from the drop-down menu. Grades 1-10 are available. If your student is in grade 11 or 12, enter grade 10. (BrightFish stories only go to 10th grade.)
Step 4: Type or paste in the User Name you would like to use. This is how students will access their unique accounts. We recommend using a minimum of 6 characters and a combination of numbers and letters or special characters (e.g. @ or .) This will ensure that your User Name will pass the criteria to be accepted.
Step 5: Type or paste in the passwords you would like students to use. We recommend using at least three numbers or letters for your passwords.
Step 6: When you are finished entering your roster, press Continue.

Step 7: If you’re ready to submit your list, press Yes. Once your list is submitted, you will get a “success” message.

Now that you have enrolled your students, you can now add them to classes.


